
Ustawienia BIOS'a
UWAGA: Wygląd ekranów BIOS w tej części służy wyłączenie jako
odniesienie.
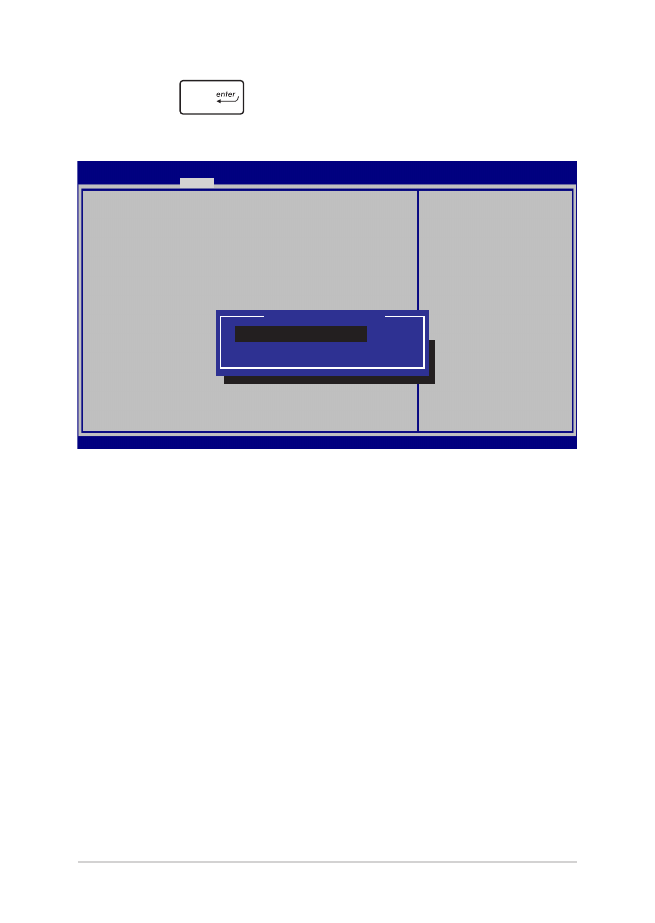
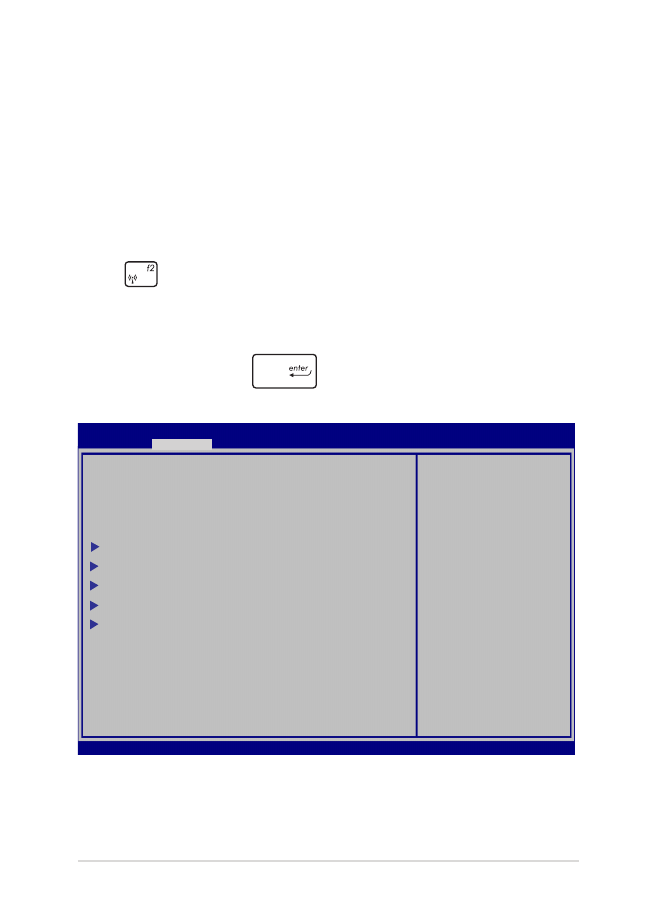
Boot (Rozruch)
To menu umożliwia ustawienie priorytetów dla opcji uruchamiania.
Podczas ustawiania priorytetu uruchamiania należy stosować się do
poniższych procedur.
1.
Na ekranie Boot (Uruchamianie), wybierz Boot Option #1 (Opcja
uruchamiania #1).
→→ : Select Screen
→→ : Select Item
Enter: Select
+/— : Change Opt.
F1 : General Help
F9 : Optimized Defaults
F10 : Save & Exit
ESC : Exit
Boot Configuration
Fast Boot [Enabled]
Launch CSM [Disabled]
Driver Option Priorities
Boot Option Priorities
Boot Option #1 [Windows Boot Manager]
Add New Boot Option
Delete Boot Option
Sets the system boot
order
Aptio Setup Utility - Copyright (C) 2012 American Megatrends, Inc.
Main Advanced
Boot
Security Save & Exit
Version 2.15.1226. Copyright (C) 2012 American Megatrends, Inc.
96
Podręcznik elektroniczny do notebooka
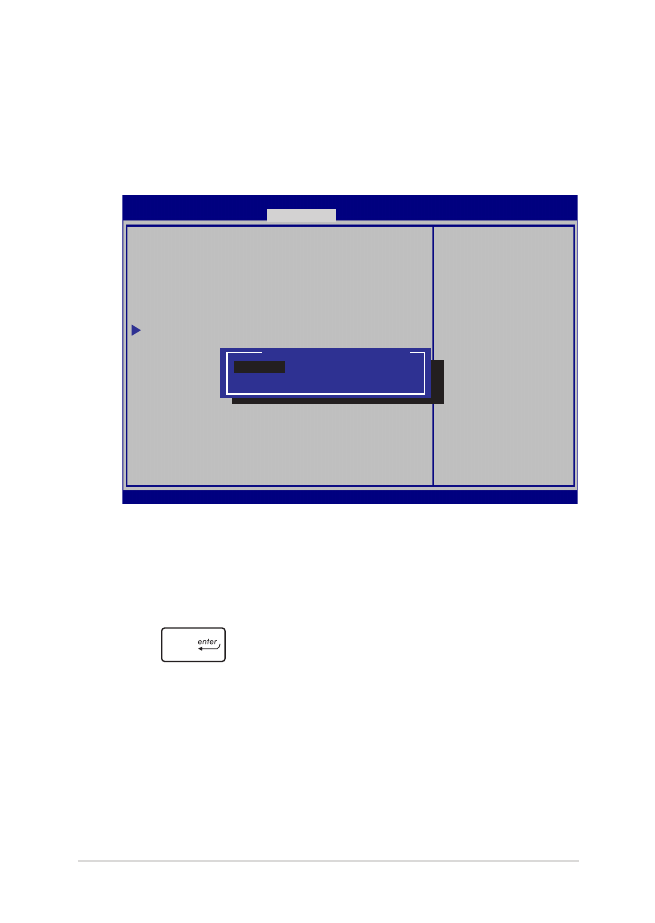
2.
Naciśnij
i wybierz właściwe urządzenie.
→→ : Select Screen
→→ : Select Item
Enter: Select
+/— : Change Opt.
F1 : General Help
F9 : Optimized Defaults
F10 : Save & Exit
ESC : Exit
Sets the system boot
order
Aptio Setup Utility - Copyright (C) 2012 American Megatrends, Inc.
Main Advanced
Boot
Security Save & Exit
Version 2.15.1226. Copyright (C) 2012 American Megatrends, Inc.
Boot Configuration
Fast Boot [Enabled]
Launch CSM [Disabled]
Driver Option Priorities
Boot Option Priorities
Boot Option #1 [Windows Boot Manager]
Add New Boot Option
Delete Boot Option
Boot Option #1
Windows Boot Manager
Disabled

Podręcznik elektroniczny do notebooka
97
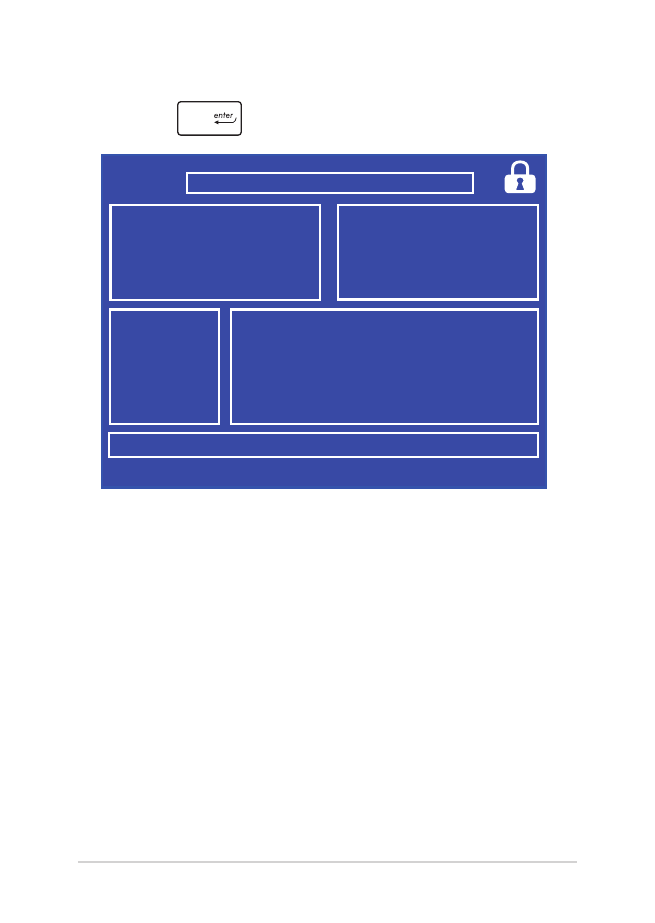
Security (Bezpieczeństwo)
To menu służy do ustawiania hasła administratora i użytkownika
w notebooku. Zapewnia ono kontrolę dostępu do napędu dysku
twardego w notebooku, interfejsu wejścia/wyjścia (I/O), a także złącza
USB.
UWAGA:
•
W przypadku ustawienia User Password (Hasła
użytkownika), konieczne będzie wprowadzenie hasła przed
uruchomieniem systemu operacyjnego notebooka.
•
W przypadku ustawienia Administrator Password (Hasła
administratora), konieczne będzie wprowadzenie hasła
przed uruchomieniem BIOS'a.
Password Description
If ONLY the Administrator’s password is set, then this only limits
access to Setup and is only asked for when entering Setup. If
ONLY the user’s password is set, then this is a power on password
and must be entered to boot or enter Setup. In Setup, the User
will have Administrator rights.
Administrator Password Status NOT INSTALLED
User Password Status NOT INSTALLED
Administrator Password
User Password
HDD Password Status : NOT INSTALLED
Set Master Password
Set User Password
I/O Interface Security
System Mode state User
Secure Boot state Enabled
Secure Boot Control [Enabled]
Key Management
Set Administrator
Password. The password
length must be in the
following range:
Minimum length 3
Maximum length 20
Aptio Setup Utility - Copyright (C) 2012 American Megatrends, Inc.
Main Advanced Boot
Security
Save & Exit
→→ : Select Screen
→→ : Select Item
Enter: Select
+/— : Change Opt.
F1 : General Help
F9 : Optimized Defaults
F10 : Save & Exit
ESC : Exit
Version 2.15.1226. Copyright (C) 2012 American Megatrends, Inc.

98
Podręcznik elektroniczny do notebooka
Aby ustawić hasło:
1.
Na ekranie Security (Zabezpieczenie), wybierz Setup
Administrator Password (Hasło administratora) lub User
Password (Hasło użytkownika).
2.
Wpisz hasło i naciśnij
.
3.
Wpisz ponownie hasło i naciśnij
.
Aby usunąć hasło:
1.
Na ekranie Security (Zabezpieczenie), wybierz Setup Administrator
Password (Hasło administratora) lub User Password (Hasło
użytkownika).
2.
Wprowadź bieżące hasło i naciśnij
.
3.
Pozostaw puste pole Create New Password (Utwórz nowe
hasło) i naciśnij
.
4.
Wybierz Yes (Tak) w oknie potwierdzającym, a następnie naciśnij
klawisz
.
Podręcznik elektroniczny do notebooka
99
Zabzpieczenie interfejsu We/Wy
W menu Security (Bezpieczeństwo) można uzyskać dostęp do
ustawień I/O Interface Security (Bezpieczeństwo interfejsu I/O),
aby blokować lub odblokowywać niektóre funkcje interfejsu
notebooka.
I/O Interface Security
LAN Network Interface [UnLock]
Wireless Network Interface [UnLock]
HD AUDIO Interface [UnLock]
USB Interface Security
If Locked, LAN
controller will be
disabled.
Aptio Setup Utility - Copyright (C) 2012 American Megatrends, Inc.
Security
→→ : Select Screen
→→ : Select Item
Enter: Select
+/— : Change Opt.
F1 : General Help
F9 : Optimized Defaults
F10 : Save & Exit
ESC : Exit
Version 2.15.1226. Copyright (C) 2012 American Megatrends, Inc.
LAN Network Interface
Lock
UnLock
Aby zablokować interfejs We/Wy:
1.
Na ekranie Security (Zabezpieczenie), wybierz I/O Interface
Security (Zabezpieczenie interfejsu We/Wy).
2.
Wybierz interfejs do zablokowania, a następnie wzbiery
.
3.
Wybierz Lock (Blokuj).
100
Podręcznik elektroniczny do notebooka
Zabezpieczenie interfejsu USB
Poprzez menu I/O Interface Security (Bezpieczeństwo interfejsu I/O)
można również uzyskać dostęp do ustawień USB Interface Security
(Bezpieczeństwo złącza USB), aby blokować lub odblokowywać
porty oraz urządzenia.
Version 2.15.1226. Copyright (C) 2012 American Megatrends, Inc.
USB Interface Security
USB Interface [UnLock]
External Ports [UnLock]
CMOS Camera [UnLock]
Card Reader [UnLock]
If Locked, all USB
device will be
disabled
Aptio Setup Utility - Copyright (C) 2012 American Megatrends, Inc.
Security
→→ : Select Screen
→→ : Select Item
Enter: Select
+/— : Change Opt.
F1 : General Help
F9 : Optimized Defaults
F10 : Save & Exit
ESC : Exit
USB Interface
Lock
UnLock
Aby zablokować interfejs USB:
1.
Na ekranie Security (Zabezpieczenie), wybierz I/O
Interface Security (Zabezpieczenie interfejsu We/Wy) >
USB Interface Password (Zabezpieczenie interfejsu USB).
2. Wybierz interfejs do zablokowania, a następnie wybierz
Lock (Zablokuj).
UWAGA: Ustawienie USB Interface (Interfejsu USB) na Lock (Blokuj)
powoduje także zablokowanie i ukrycie External Ports (Portów
zewnętrznych) oraz innych urządzeń występujących w opcji USB
Interface Security (Bezpieczeństwo złącza USB).
Podręcznik elektroniczny do notebooka
101
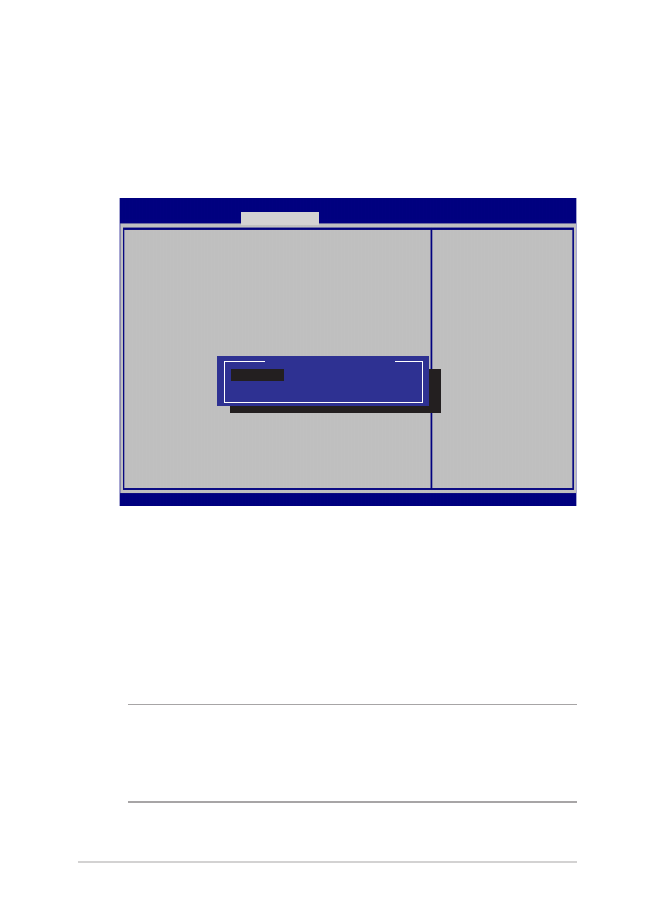
Set Master Password (Ustawienie hasła głównego)
W menu Security (Bezpieczeństwo) można użyć opcji Set Master
Password (Ustawienie hasła głównego), aby skonfigurować
dostęp do napędu dysku twardego przy użyciu hasła.
Aptio Setup Utility - Copyright (C) 2011 American Megatrends, Inc.
Set HDD Master
Password.
***Advisable to Power
Cycle System after Setting
Hard Disk Passwords***
Aptio Setup Utility - Copyright (C) 2012 American Megatrends, Inc.
Main Advanced Boot
Security
Save & Exit
→→ : Select Screen
→→ : Select Item
Enter: Select
+/— : Change Opt.
F1 : General Help
F9 : Optimized Defaults
F10 : Save & Exit
ESC : Exit
Version 2.15.1226. Copyright (C) 2012 American Megatrends, Inc.
Password Description
If ONLY the Administrator’s password is set,then this only
limits access to Setup and is only asked for when entering
Setup. If ONLY the user’s password is set, then this is a
power on password and must be entered to boot or enter
Setup. In Setup, the User will have Administrator rights.
Administrator Password Status NOT INSTALLED
User Password Status NOT INSTALLED
Administrator Password
User Password
HDD Password Status : NOT INSTALLED
Set Master Password
Set User Password
I/O Interface Security
Aby ustawić hasło dysku twardego:
1. Na ekranie Security (Zabezpieczenie), kliknij Set Master
Password (Ustaw hasło nadrzędne).
2.
Wpisz hasło i naciśnij
.
3.
Wpisz ponownie, aby potwierdzić hasło i naciśnij
.
4. Kliknij
Set User Password (Ustaw hasło użytkownika)
i powtórz poprzednie czynności w celu ustawienia hasła
użytkownika.

102
Podręcznik elektroniczny do notebooka
Save & Exit (Zapis i wyjście)
Aby zachować ustawienia konfiguracyjne, należy wybrać opcję Save
Changes and Exit (Zapis zmian i wyjście) przed opuszczeniem BIOS'a.
Aptio Setup Utility - Copyright (C) 2012 American Megatrends, Inc.
Main Advanced Boot Security
Save & Exit
→→ : Select Screen
→→ : Select Item
Enter: Select
+/— : Change Opt.
F1 : General Help
F9 : Optimized Defaults
F10 : Save & Exit
ESC : Exit
Version 2.15.1226. Copyright (C) 2012 American Megatrends, Inc.
Save Changes and Exit
Discard Changes and Exit
Save Options
Save Changes
Discard Changes
Restore Defaults
Boot Override
Windows Boot Manager
Launch EFI Shell from filesystem device
Exit system setup after
saving the changes.
Podręcznik elektroniczny do notebooka
103
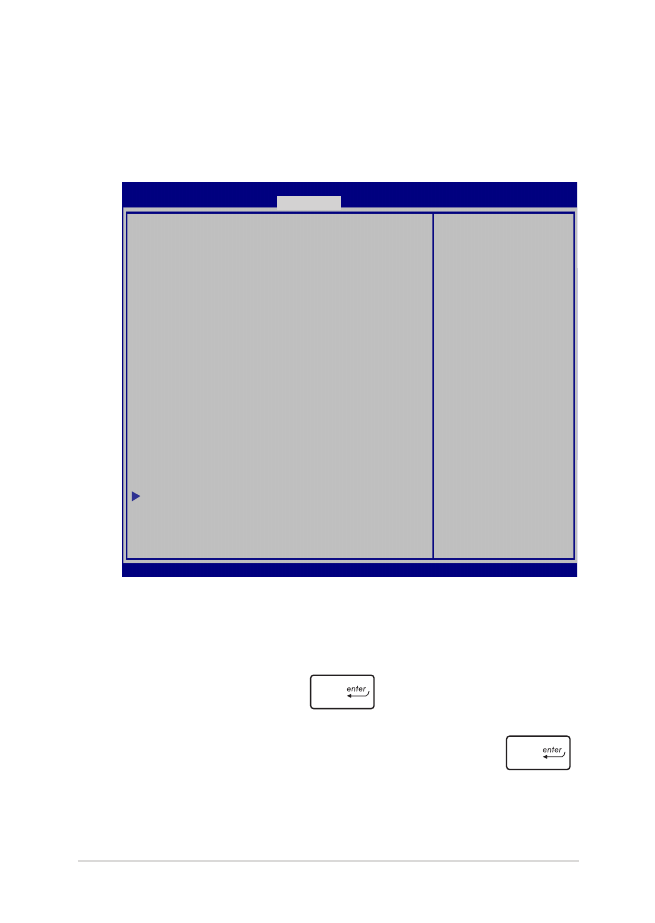
Aktualizacja BIOS:
1.
Sprawdź model notebooka, a następnie pobierz najnowszy plik
BIOS'a dla tego modelu ze strony internetowej ASUS.
2.
Zapisz kopię pobranego pliku BIOS'a na dysku Flash.
3.
Podłącz dysk Flash do notebooka.
4.
Uruchom ponownie notebooka, a następnie naciśnij klawisz
podczas wykonywania testów POST.
5.
W programie konfiguracji BIOS, kliknij Advanced
(Zaawansowane) > Start Easy Flash (Uruchom Easy Flash), a
następnie naciśnij
.
Aptio Setup Utility - Copyright (C) 2011 American Megatrends, Inc.
Start Easy Flash
Internal Pointing Device [Enabled]
Wake on Lid Open [Enabled]
Power Off Energy Saving [Enabled]
SATA Configuration
Graphics Configuration
Intel (R) Anti-Theft Technology Corporation
USB Configuration
Network Stack
Press Enter to run the
utility to select and
update BIOS.
Aptio Setup Utility - Copyright (C) 2012 American Megatrends, Inc.
Main
Advanced
Boot Security Save & Exit
→→ : Select Screen
→→ : Select Item
Enter: Select
+/— : Change Opt.
F1 : General Help
F9 : Optimized Defaults
F10 : Save & Exit
ESC : Exit
Version 2.15.1226. Copyright (C) 2012 American Megatrends, Inc.
104
Podręcznik elektroniczny do notebooka
6.
Odszukaj pobrany plik BIOS'a na dysku Flash, a następnie naciśnij
klawisz
.
7.
Po zakończeniu procesu aktualizacji BIOS, kliknij Exit (Zakończ)
> Restore Defaults (Przywróć domyślne) w celu przywrócenia
systemu do ustawień domyśnych.
FSO
FS1
FS2
FS3
FS4
0 EFI
<DIR>
ASUSTek Easy Flash Utility
[←→]: Switch [↑↓]: Choose [q]: Exit [Enter]: Enter/Execute
Current BIOS
Platform: G550
Version: 101
Build Date: Oct 26 2012
Build Time: 11:51:05
New BIOS
Platform: Unknown
Version: Unknown
Build Date: Unknown
Build Time: Unknown
FLASH TYPE:
MXIC 25L Series

Podręcznik elektroniczny do notebooka
105